Order Options / Allowed Portions / Business Day
Hide the Exit Button - this check box is a security feature that turns off the Exit button so it is not displayed on the main screen of Point of Success Order. There is, however, an exit button under the 'Manager' button. Exit the system using that button. (see Point of Success: Manager Button for more information)
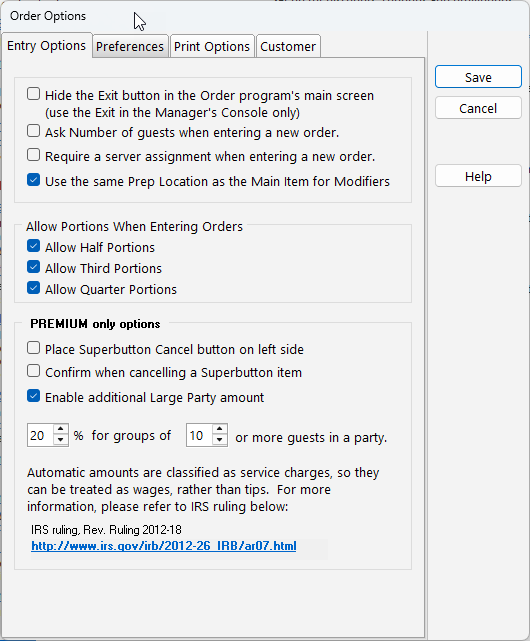
Ask Number of Guests when entering a new order - this check box forces users to enter a guest count when taking an order and when splitting an order into multiple tickets.
Require a server assignment when entering a new order - When this options is checked, pressing "New Order" is request a guest count to be entered before taking the order. The number of guests can be changed during order taking. This option forces the question to be answered initially if this question should be answered for each order.
User the same Prep Location as the Main Item for Modifiers - This functionality allows user to have modifiers on hierarcical buttons and Superbuttons inherit the prep location of the parent or main item being ordered. If this box is checked, the program will ignore the prep location of the product established in Product Entry and instead, use the same prep location as the parent. This will keep main items and modifiers (sometimes called parent items and child items) together.
Allow Portions When Entering Orders - These check boxes allow the user to suppress the display depending on which portions are allowed. Items can be divided into halves, thirds, or quarter portions. The pricing for halves, thirds, and quarters can be calculated directly or it can be designated under 'Advanced Pricing' when setting up products. See 'Advanced Pricing' under the Products center for more information.
Enable additional Large Party amount - Users who wish to automatically impose a gratuity or additional fee for larger parties can set the percentage assessed and the number of guests that is the threshold to charge this percentage. The rules governing large party fees or gratuities are being watched by the IRS. Learn more at http://www.irs.gov/irb/2012-26_IRB/ar07.html. Taxation rules may change. We are not responsible for the choice to charge a large party gratuity. This is a business decision after learning the implications of having such a policy.

When this option is active, it shows Daily Order Settings which allows the user to set the 'Current Business Day'. Also, the 'When Entering Orders' radio buttons allow the user to set up and start order numbers from 1 each day. Each day, when the system is closed, a new business day is designated. The Daily Order Sequence number (order number that starts over each business day) is reset and the new day begins at one (1).
How to Calculate the Business Day - If 'Use the calendar day' is chosen, the computer assumes that all transactions, orders, etc. will be associated with a particular date that ends at midnight. If 'Use the "Business Day"' is chosen, the computer stamps each order, customer, etc. with a 'business day'. This 'business day' will be the overriding designation when calculating reports and grouping orders together. Even if the date changes on the computer (i.e. if hours of operation exceed midnight) the 'business day' remains the same and all qualifying orders, tills, banks, customers, etc. will be associated with that 'business day'. The date is not advanced to the next day until the "Close Day" button is executed in Order Entry > Manager. Pressing this button will close the day and give the user the opportunity to designate the next business day (which could be the next sequential day or another day in the future).
When using the "Calendar Day" setting, midnight is the cutoff for the business day. Check the "Auto-close the day at specified time (other than midnight)" option to alter the closing time to a time other than midnight but not require manually closing the day.
Show Items on Ticket - This check box allows the user to show or hide the 'normally included' items on a combination pizza on receipts. If this box is checked, the 'normally included' items will automatically appear on the ticket when ordered.
Show improper shutdown message - This setting notifies the user if the computer is being forced to shut down instead of being closed and shut down as intended. It is for operational information only.
When modifying an item on an order, place the word "Add" in front of the item. - This setting will allow the word "Add" to be appended to the front of an added item. Un-check this setting to remove the automatic addition of the word "Add".
When splitting tickets, do not remove discounts - Discounts are removed when splitting tickets but can be retained using this check box.
Show "Normally Included" items on the order when using Combination and Super Buttons - The items that are normally included when ordering using a combination button can be included on the prep ticket if this box is checked.
Allow delivery drivers to clock out with open delivery orders - Normally, delivery drivers are restricted from clocking out until they have paid all the open orders attributed to them. This check box allows this practice to be suspended.
Allow staff to clock out with open orders - Staff members are normally prohibited from clocking out if they have open orders. Open orders are not paid so this is a security measure. To override this, check the box allowing them to clock out even though they have open orders.

Use the Order Monitor program for printing prep tickets for orders dated in the future. - this option turns on 'Future Order' processing. There are several elements to consider here:
| 1. | Future orders are orders that are placed to be prepared and delivered at a future time or date instead of prepared immediately for delivery and consumption. |
| 2. | A separate program called Order Monitor manages future orders and prints their tickets at the designated prep ticket print time. |
| 3. | Future orders cannot be printed if the Order Monitor is not running. |
| 4. | Future Orders are taken in the same manner that regular orders are but the Future Order date and time are filled in by pressing the Promised Time box at the bottom of the ticket in Order Entry. |
Default prep minutes - This value automatically sets the prep time when a future order promised time is set. This saves having to key in both the promised time and the prep time during order-taking.
Print Voided Prep Ticket when order is voided - this option is intended for kitchen or preparation communication. If an order is voided, its preparation is no longer necessary. To let the kitchen staff know, this option allows for a second prep ticket indicating the voided order to be printed.
Never print a merchant copy of On Account Receipt - this option turns off printing receipts when an On Account payment is made. Typically, there is no need for a receipt.
Use Account Billing - This option turns on the account billing system. Accounts are maintained when customers are allowed to pay orders later, over time, or on house account. To fully activate account billing, turn on this option and also do the following:
1.In Customer Entry, at the bottom of the Name and Address tab, check the box marked "Use Account Billing"
2.In Customer Entry, at the bottom of the Name and Address tab, establish a "Credit Limit" meaning the restriction on the total amount a customer can charge when using Account Billing.
3.In Tools, Tender Types, enter a tender type for "On Account" and make sure the "Type of Tender" is set to "On Account."
4.In Order Entry Options, on the Print Options tab, determine business preference to print a merchant copy of On Account Receipt by checking the "Never print a merchant copy of On Account Receipt."
5.Optional: Setup and use Billing Codes for filtering and grouping On-Account customers
Print Expeditor ticket immediately on Done - The Expeditor function is discussed in greater detail in the link provided. One setting for the Expeditor is when the Expeditor Ticket should print. This setting prints the Expeditor ticket immediately after the order is taken instead of later in the order preparation process.

Pop up customer birthday message on their birthday - This option pops up a message on the screen whenever a customer's record is accessed and it is their birthday. This is for informational purposes only.
Customer Phone Type Default - The two types of default phone types are "Home" and "Mobile" - the default is checked when taking an order and entering a customer's telephone number.