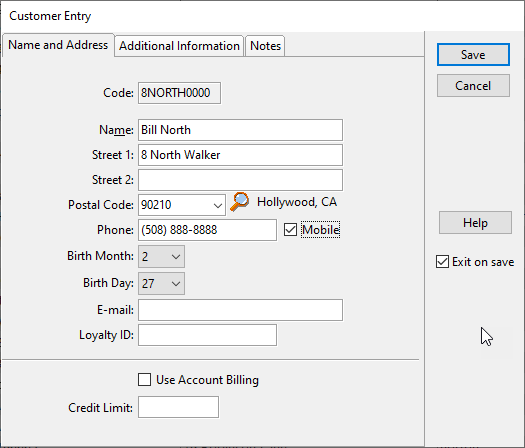
The Customer Entry center is where customers is entered. If there is a list of customers to be keyed into the system, it is entered here. Customers can also be set up on the fly during Order Entry.
Customer code is a way for the computer to keep track of customers using a single, unique identifier. This code can be chosen by the user or if left blank, the computer will automatically generate a code using a combination of the fields in Customer Entry. Once a customer code has been established it cannot be changed.
Enter the customer's name, street address, postal code (city and state/province are filled in automatically if they exist), birth month and birth day, email address and loyalty number if applicable. This information will be useful if the customer becomes inactive and reactivation activities are determined to be effective. A customer's accurate address, including email address, is valuable for customer communication and marketing purposes.
Phone Number - A Phone number grid is provided to associate multiple phone numbers to one customer. Each phone number is searchable. Type the number, description, and the type of phone (home, office, cellular phone, etc.) This means that if a customer calls from additional phone numbers, each relates back to the customer calling. This helps eliminate duplicate or multiple records for the same customer in the database.
Birth Month - Enter the customer's birth month from the drop down menu. The birth month can also be entered on the fly when entering a customer in Order Entry.
Birth Day - Enter the customer's birth day from the drop down menu. The birth day can also be entered on the fly when entering a customer in Order Entry.
Email Address - Enter the customer's email address. Email address information can also be gathered at the time an order is taken.
Loyalty ID - Enter a customer's Loyalty ID number. This number is a unique number that identifies a customer and tracks their loyalty information.
Use Account Billing - This option turns on the account billing system. Accounts are maintained when customers are allowed to pay orders later, over time, or on house account. To fully activate account billing, turn on this option and also do the following:
1.In Customer Entry, at the bottom of the Name and Address tab, check the box marked "Use Account Billing"
2.In Customer Entry, at the bottom of the Name and Address tab, establish a "Credit Limit" meaning the restriction on the total amount a customer can charge when using Account Billing.
3.In Tools, Tender Types, enter a tender type for "On Account" and make sure the "Type of Tender" is set to "On Account."
4.In Order Entry Options, on the Print Options tab, determine business preference to print a merchant copy of On Account Receipt by checking the "Never print a merchant copy of On Account Receipt."
5.Optional: Setup and use Billing Codes for filtering and grouping On-Account customers
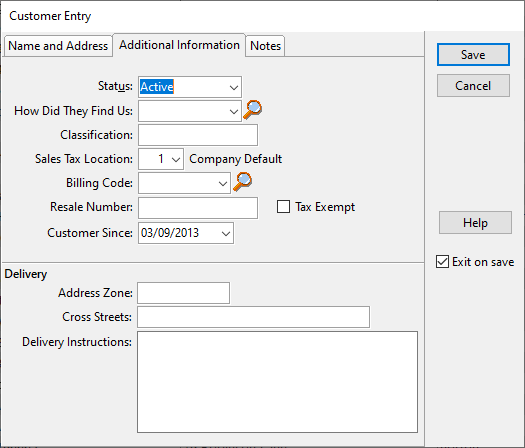
Once the first screen has been completed, switch to the second tab to continue entering customer information.

Status - Refers to the current status of the customer. The choices are Active, Hold, Collections, and Inactive. Customers that are not in good standing with the business because they owe money or have bounced checks can be placed on status Hold or Collections and the user will be notified when these types off accounts are accessed.
How Did They Find Us - Choose from the list of referral sources
Classification - Use this field to filter customers.
Sales Tax Location - This drop down list chooses which tax location the customer belongs to so they can be charged the appropriate sales tax. Locations are based on surrounding areas that charge different tax rates per location.
Billing Code - This designation groups customers into groups for segmented billing. Clearer reporting results from grouping customers by billing code.
Resale Number - For a customer who should not be charged tax that will require accounting of their orders, enter their resale number.
Tax Exempt - Will not charge this customer tax on their orders. This check box exempts this particular customer from being charged sales tax.
Customer Since - This is the date the customer was first entered into the system. This date is used to calculate the value of a customer for a given range of time.
Address Zone - Used to designate a zone in the local city grid in which the customer resides. This is user definable and used to assist in delivery.
Cross Streets - This records the major cross streets for the customer. This is saved for permanent records but may be updated each time the customer calls.
Delivery Instructions - If there are special delivery instructions for this customer, they can be entered here and stored for use each time the customer orders.

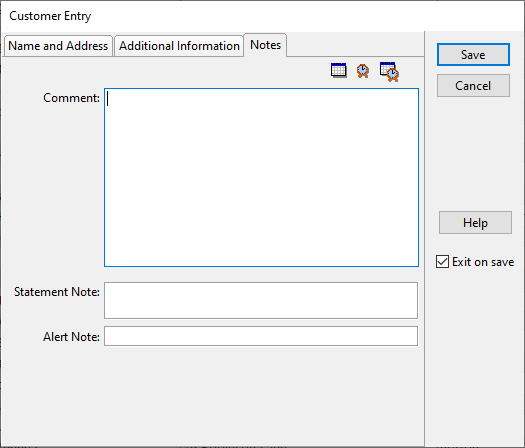
Comment - Switch to the 'Notes' tab in Customer Entry to enter any information to be saved about this customer. A date and time stamp helps keep track of conversations between customers and the user. Documentation helps guard against customers who try to take advantage of the user.
Statement Notes - Notes specific to printed statements are entered in this field.
Alert Note - Use Alert Notes to generate a customized alert about a customer. In Order Entry, when that customer is chosen, the Alert Note will be displayed and the message must be OK'd to continue to serve this customer.
The magnifying glass icon adjacent to the fields represents a search. To search the data stored from the field or to add additional data to the list, press the magnifying glass and the search / edit / add screen will appear. In most cases the user has the ability to add or remove records as well as locate records using this key.
