Backup

Database Administrator is a separate program that manages the database and offers additional data protection and maintenance functions.
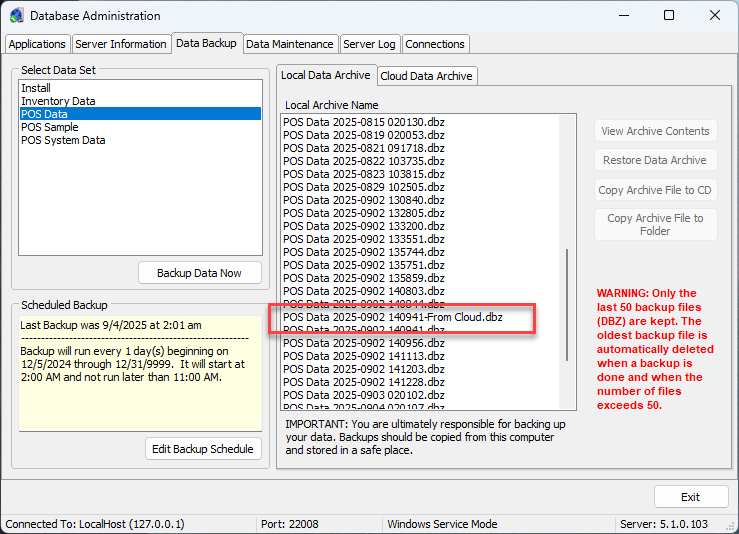
Each data element is listed in the Database Administrator under the 'Data Backup' tab. To manually back up one or all of these data elements, click the element to back up and press the 'Backup Data Now' button. A backup archive will be created and displayed in the space adjacent to the data elements entitled 'Archive Name'.
To automatically back up any or all of the data elements listed in the 'Select Data Set' area, first click the data set to be scheduled. Note that the POS Data element is the main data for Point of Success.
The latest 50 backup files will be stored. (The number of backup files retained is configurable - see below.) On the 51st backup, the earliest backup will be automatically deleted. This helps keep the backup folder from growing without the user's knowledge. To store more than 50 archive/backup files, copy the files to another location on the hard drive from the c:\point of success\backup folder.
There are several options available for backing up date files. Each set of data can be configured to automatically back up at different intervals. Scheduling the backup functions only needs to be configured once. Backups will occur according to the scheduling at each interval scheduled.

Press the 'Edit Backup Schedule' to set the parameters of the automatic backup. Each time the scheduled time arrives, the backup will automatically occur. NOTE: Backing up data does not require that all users exit the programs and can be done while the data is being used. It is recommended that backups be scheduled during times of light or no use on the system, however, to ensure that there is no interruption in serve or performance issues which may occur during backups.
There is a setting that is useful to configure for the database. In an effort to reduce the amount of disc space required for multiple backup files, the following setting is provided:
MaxBackupFiles |
This setting controls how many backup files (dbz) are kept in the Backup folder. The default is 50. Example: [Server Parameters] MaxBackupFiles=30 |
|
|
Steps to use this setting:
1. On the desktop, right-click and choose 'New' to create a new file. Rename the file dbserver.ini. This will be the file you create and edit to put in the settings you desire. Note: when you change the extension from ".txt" to ".ini" it will give you the following warning:

2. Click "Yes" to accept the change to dbserver.ini. Note the icon will change. The file should look like this:

2. Edit the file you created. Use Notepad or another text editor to edit the file. Right-click on the file and choose to Open the file.
3. The first line should say [Server Parameters] including the square brackets. An example follows.

4. Once the parameter is defined, click File, Save to save the changes to this file.
5. Put the file in place - in the C:\Program Files (x86)\ADBServer folder.

There are other files in this location as well. You may get a warning that says:

Click "Continue" to copy the file in the ADBServer folder.
6. IMPORTANT: Restart the Arsenal Database Server. To do this, click start and type "Services" and run the Services app. You will see this window:

Simply click "Restart" and the Arsenal Database Server will stop and restart - using the new dbserver.ini configuration file you copied in in step 5. Rebooting the computer will also restart the Arsenal Database Server.
This configuration file will set either or both of these settings for the database server. Both are explained below.
MaxBackupFiles
By default, Arsenal Database Server retains 50 backup files. However, if hard drive space is at a premium or fewer files are required, setting this number allows a different number of files to be retained. Use this configuration to set the number of files to be retained.
Cloud Backup
To backup to the cloud, for disaster recovery purposes, Cloud Data Archive backups must be activated by Point of Success. Call 800-752-3565 to activate cloud backup. Once activated, Cloud Data Archive functionality will begin. Cloud backups are made immediately following the local backup performed according to the schedule set in Database Administrator, Data Backup tab. POS Data and POS System Data are included in the backup according to their respective schedules.This function can be enabled or disabled from this screen.
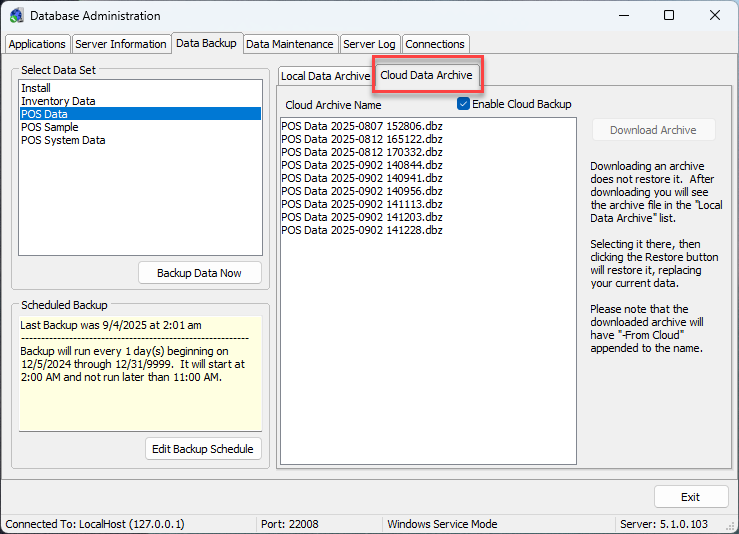
To restore a Cloud Data Archive, click the archive to download. Press "Download Archive" and the selected archive will be downloaded back to the local list of data backups.

To find the restored backup, look back on the "Local Data Archive" list. The restored backup will be named as it was in the cloud, with the additional information appended on the file name. The words "From Cloud" are added to differentiate the file from the other local backups.